Controlling an LED using Embedded Swift on nRF52
Introduction
In my previous post, nrfx-blink Step by Step, I took you through the steps required to configure your development environment to build and flash the “Blinky” Embedded Swift example from Apple on an nRF52840 DK. In this post, we’ll explore that example more deeply, grow from there, and adapt it to be more natural for Swift developers.
If you want to follow along, the code is available on GitHub with each step having its own commit.
Exploring the Apple provided project
Let’s open the project in VS Code and explore its content.
Info
For instructions on how to work with Embedded Swift projects in VS Code, see my previous post nrfx-blink Step by Step.
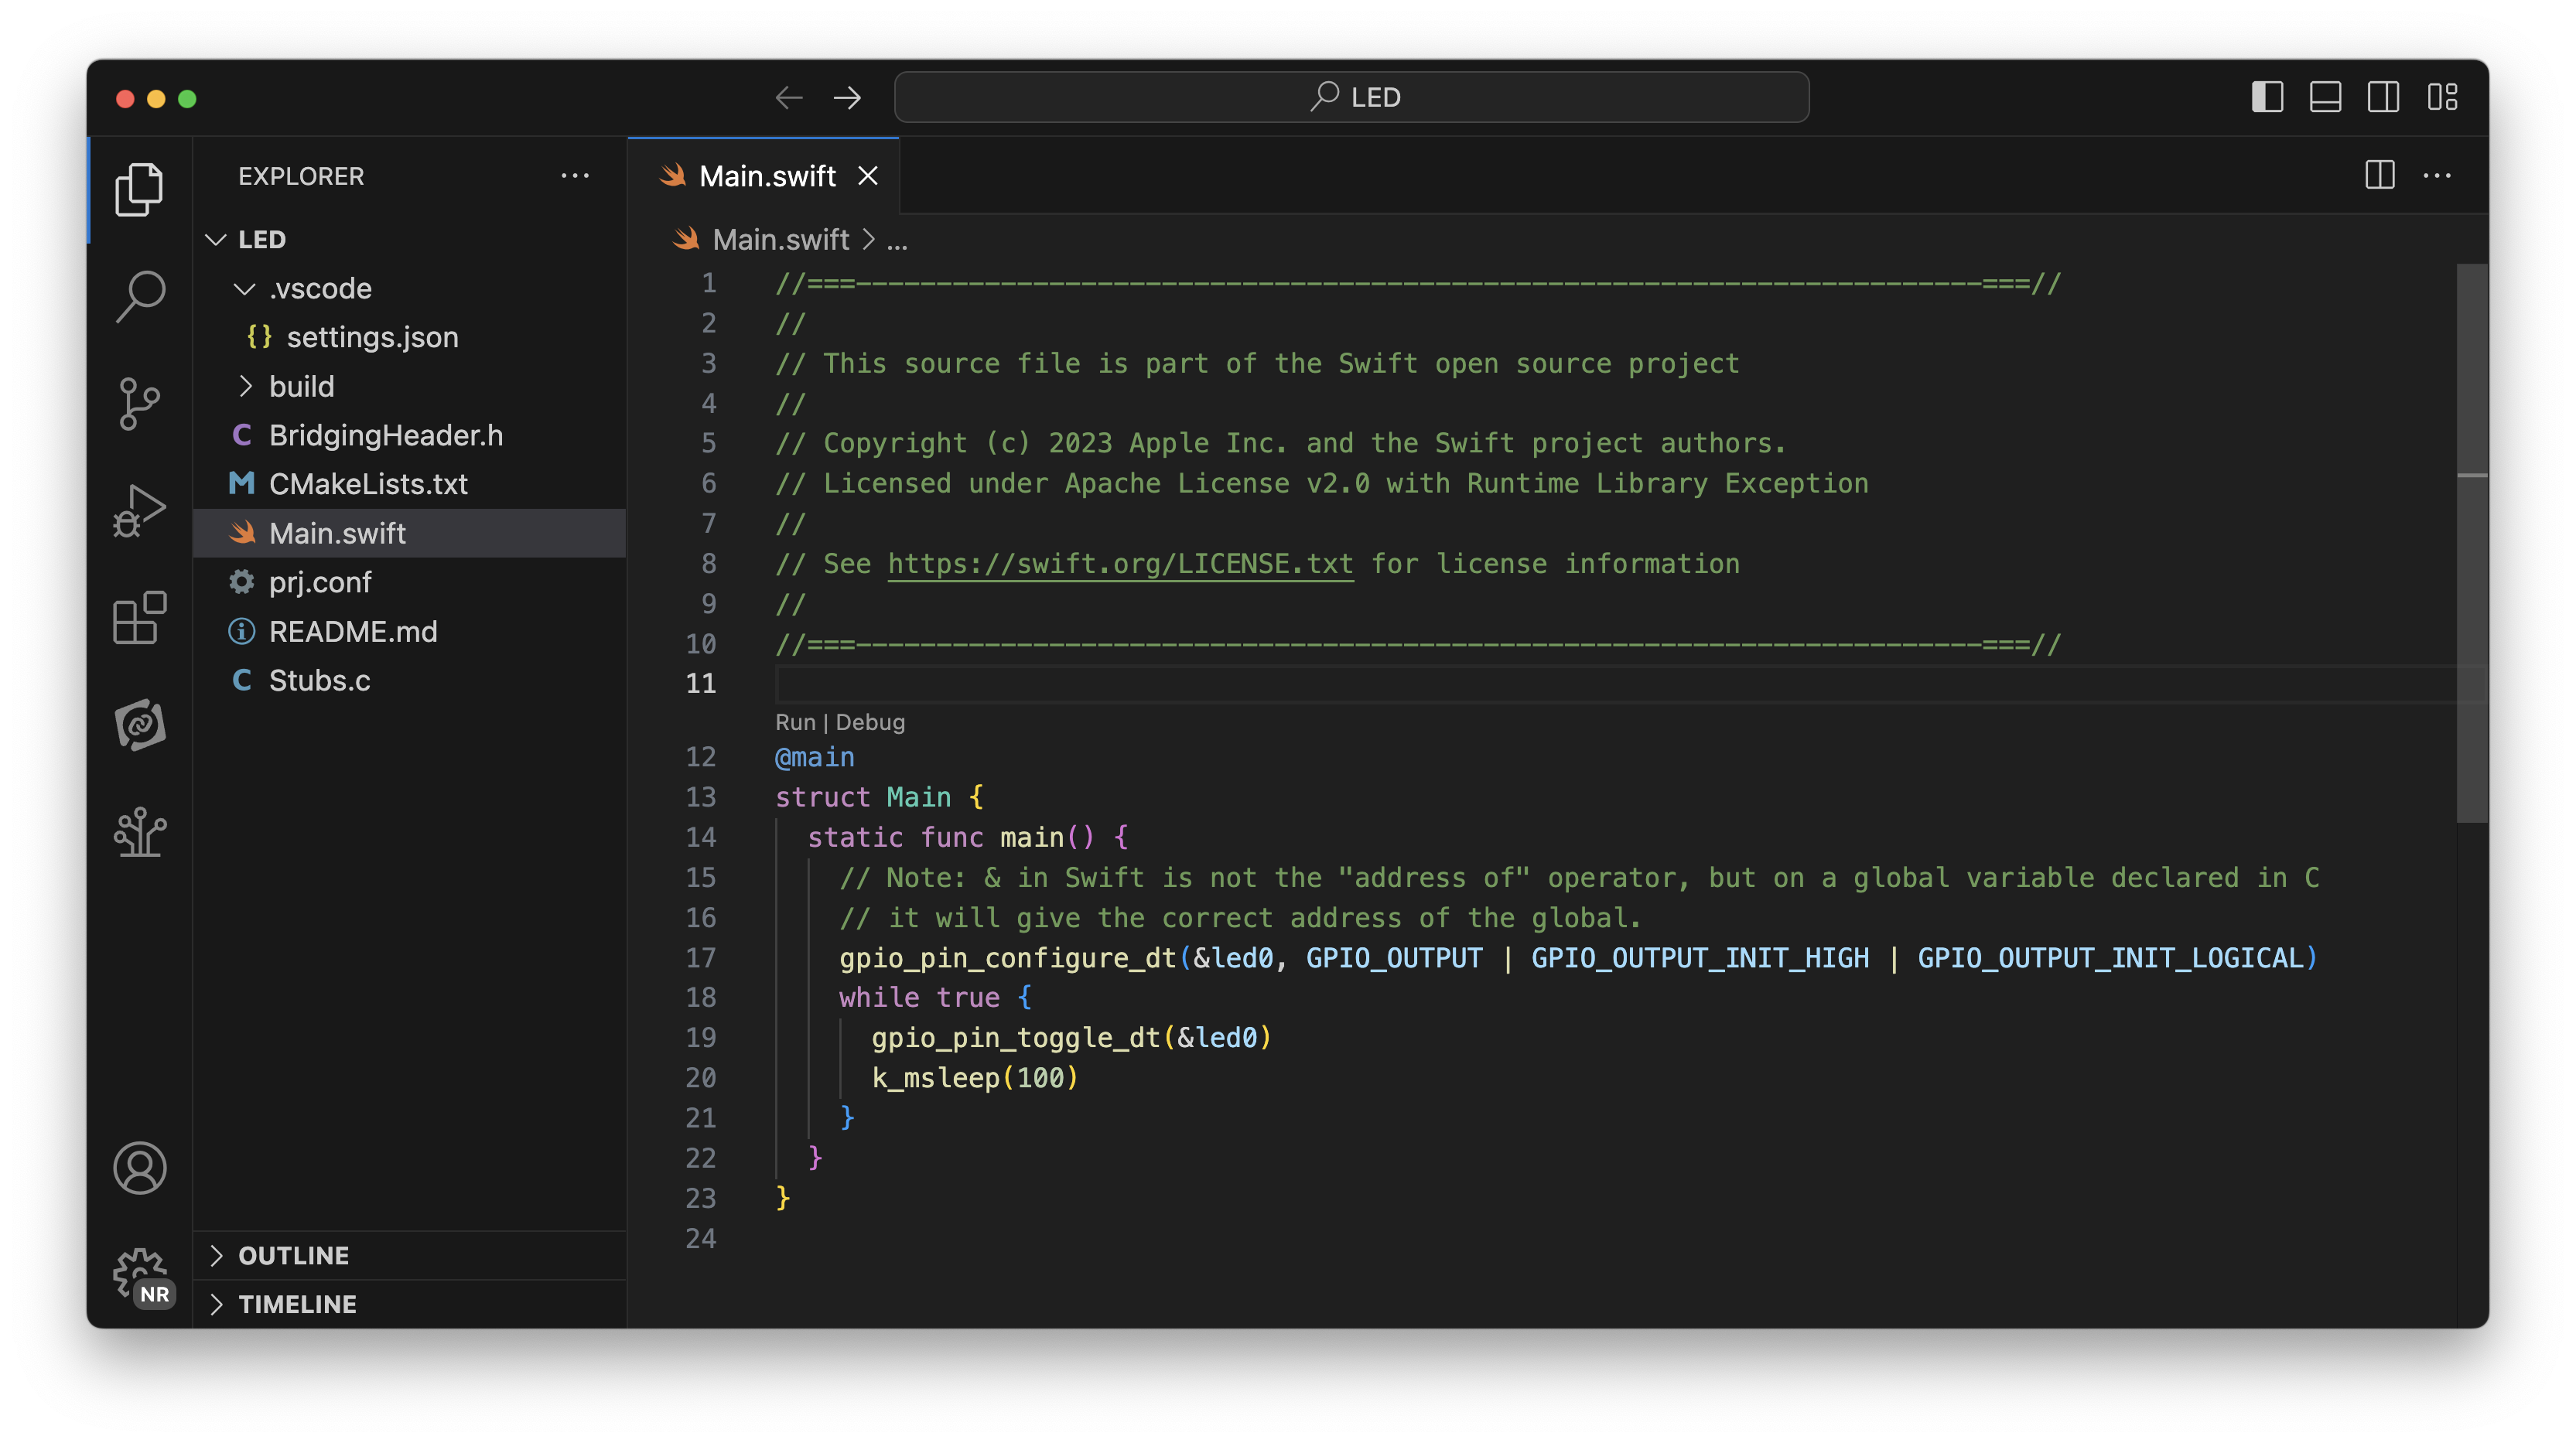
The nrfx-blink example project opened in VS Code
Let’s start by looking at the (start of the) CMakeLists.txt file.
cmake_minimum_required(VERSION 3.29)
find_package(Zephyr REQUIRED HINTS $ENV{ZEPHYR_BASE})

# Use the armv7em-none-none-eabi target triple for Swift
set(CMAKE_Swift_COMPILER_TARGET armv7em-none-none-eabi)
# Enable "wmo" as needed by Embedded Swift
set(CMAKE_Swift_COMPILATION_MODE wholemodule)
# FIXME: Skip checking if the compiler works
set(CMAKE_Swift_COMPILER_WORKS true)

# Create a new project called "blinky" and enable "Swift" as a supported language
project(blinky Swift)

# Set global Swift compiler flags
add_compile_options(
    # Enable Embedded Swift
    "$<$<COMPILE_LANGUAGE:Swift>:SHELL:-enable-experimental-feature Embedded>"
This is the configuration file for the CMake tool, which is some form of meta-build tool used by nRF Connect SDK projects. Based on the above file, it’ll generate the configuration for the final build tool, in this case Ninja.
From the extract above, you can notice some key configuration options related to Swift usage.`
cmake_minimum_required(VERSION 3.29)
This indicates the minimum version required for this build. Note that this is a higher version than the one included in the nRF Connect SDK toolchain (at least the current 2.7.0 version).
We then see a series of instructions related to Swift compilation, like enabling Swift support and setting compiler flags. Look at the comments in the CMakeFiles.txt file for more information.
Let’s now take a look at the Swift source code.
@main
struct Main {
  static func main() {
    // Note: & in Swift is not the "address of" operator, but on a global variable declared in C
    // it will give the correct address of the global.
    gpio_pin_configure_dt(&led0, GPIO_OUTPUT | GPIO_OUTPUT_INIT_HIGH | GPIO_OUTPUT_INIT_LOGICAL)
    while true {
      gpio_pin_toggle_dt(&led0)
      k_msleep(100)
    }
  }
}
While this may look like standard Swift code, there are calls to functions like gpio_pin_configure_dt and references to &led0and GPIO_OUTPUT, where do these from from ?
To get some idea about that, let’s look at the BridgingHeader.h file.
#include <autoconf.h>

#include <zephyr/kernel.h>
#include <zephyr/drivers/gpio.h>

#define LED0_NODE DT_ALIAS(led0)
static struct gpio_dt_spec led0 = GPIO_DT_SPEC_GET(LED0_NODE, gpios);
This is a standard C header file that’s used to expose C functions (or C code in general) to Swift. If you look in CMakeLists.txt, you’ll see the -import-bridging-header flag referencing this file being passed to the Swift compiler.
In the header file above, we can see we’re importing the headers for the Zephyr SDK (on which nRF Connect SDK is based) and we’re declaring a static variable led0 (with the help of the macros provided by the SDK).
We can use those C constructs in our Swift code thanks to the Swift C Interop, which is part of the language since day one. You can find more information about this in C Interoperability , in the Apple Developer Documentation.
Taking another look at our main function, it doesn’t feel very “Swifty”, in fact it’s mostly glue code around C calls.
Creating a basic struct
To make the code more “Swifty” and abstract the C-level details, let’s create a Led struct that isolates the C calls and provides a clean Swift interface to its caller.
struct Led {
  init() {
    // Note: & in Swift is not the "address of" operator, but on a global variable declared in C
    // it will give the correct address of the global.
    gpio_pin_configure_dt(&led0, GPIO_OUTPUT | GPIO_OUTPUT_INIT_HIGH | GPIO_OUTPUT_INIT_LOGICAL)
  }

  func toggle() {
     gpio_pin_toggle_dt(&led0)
  }
}
With that in place, our main function reads much more like typical Swift code, instantiating a struct and calling a method on it.
@main
struct Main {
  static func main() {
    let led = Led()
    while true {
      led.toggle()
      k_msleep(100)
    }
  }
}
Making it configurable
This version however, hardcodes the GPIO pin that is used to drive the LED. That doesn’t make for re-usable code.
To make it configurable, we need to pass the GPIO pin driving the LED to our struct initializer.
Looking back at the declaration of the led0 variable
static struct gpio_dt_spec led0 = GPIO_DT_SPEC_GET(LED0_NODE, gpios);
and the way it’s used in the calls
gpio_pin_toggle_dt(&led0)
we see we’re using a C pointer to a C struct.
The Calling Functions With Pointer Parameters page of the Apple Developer Documentation gives some explanations on the topic and points to using UnsafePointer, as shown in the code below.
struct Led {
  let gpio: UnsafePointer<gpio_dt_spec>

  init(gpio: UnsafePointer<gpio_dt_spec>) {
    self.gpio = gpio
    // Note: & in Swift is not the "address of" operator, but on a global variable declared in C
    // it will give the correct address of the global.
    gpio_pin_configure_dt(gpio, GPIO_OUTPUT | GPIO_OUTPUT_INIT_HIGH | GPIO_OUTPUT_INIT_LOGICAL)
  }

  func toggle() {
     gpio_pin_toggle_dt(gpio)
  }
}
And in our main function, we can just initialize our struct using
let led = Led(gpio: &led0)
We now have a re-usable struct that can be used to control an LED connected to any of the GPIO of the system.
Handling errors
When following the nRF Connect SDK Fundamentals training from the Nordic Developer Academy, one can read that “before using the device pointer contained in gpio_dt_spec, we need to check if it’s ready using gpio_is_ready_dt()”.
Let’s create an error to represent that condition
enum LedError: Error {
  case notReady
}
and perform the test in our initializer, making it throwing
struct Led {
  let gpio: UnsafePointer<gpio_dt_spec>

  init(gpio: UnsafePointer<gpio_dt_spec>) throws {
    if (!gpio_is_ready_dt(gpio)) {
      throw LedError.notReady
    }
  …
}
For now, we’ll just ignore the thrown error
@main
struct Main {
  static func main() {
    let led = try? Led(gpio: &led0)
    while true {
      if let led {
        led.toggle()
      }
      k_msleep(100)
    }
  }
}
Info
As you can see above, throwing initializers are nice as you can also use them as failable initializers if you’re not interested in the exact error that occurred.
And the build fails !
…/EmbeddedSwift-nRF52-Examples/LED/Main.swift:30:22: error: cannot use a value of protocol type 'any Error' in embedded Swift
10 | //===----------------------------------------------------------------------===//
11 |
12 | @main
   | `- note: called from here
13 | struct Main {
14 |   static func main() {
15 |     let led = try? Led(gpio: &led0)
   |                    `- note: called from here
16 |     while true {
17 |       if let led {
   :
28 |   init(gpio: UnsafePointer<gpio_dt_spec>) throws {
29 |     if (!gpio_is_ready_dt(gpio)) {
30 |       throw LedError.notReady
   |                      `- error: cannot use a value of protocol type 'any Error' in embedded Swift
31 |     }
32 |
ninja: build stopped: subcommand failed.
FATAL ERROR: command exited with status 1: /opt/nordic/ncs/toolchains/f8037e9b83/bin/cmake --build …/EmbeddedSwift-nRF52-Examples/LED/build
The error mentions any Error, that is because a simple throws statement is identical to throws any Error. And that’s an existential type, which is not supported by Embedded Swift.
This is easily fixed by using Typed throws, introduced with Swift 6.
  init(gpio: UnsafePointer<gpio_dt_spec>) throws(LedError) {
    if (!gpio_is_ready_dt(gpio)) {
      throw .notReady
    }
…
As one can see above, this has the added benefit that we don’t need to specify the type at the throw site, as it’s defined in the throws declaration.
Really handling errors
In the code above, we’ve just ignored the thrown error, let’s now catch it and print an error message in case of error.
@main
struct Main {
  static func main() {
    do {
      let led = try Led(gpio: &led0)
      while true {
        led.toggle()
        k_msleep(100)
      }
    } catch {
      print("Could not initialize LED")
    }
  }
}
And the build fails again !
[3/7] Linking C executable zephyr/zephyr_pre0.elf
FAILED: zephyr/zephyr_pre0.elf zephyr/zephyr_pre0.map …/EmbeddedSwift-nRF52-Examples/LED/build/zephyr/zephyr_pre0.map
: && ccache /opt/nordic/ncs/toolchains/f8037e9b83/opt/zephyr-sdk/arm-zephyr-eabi/bin/arm-zephyr-eabi-gcc  -gdwarf-4 zephyr/CMakeFiles/zephyr_pre0.dir/misc/empty_file.c.obj -o zephyr/zephyr_pre0.elf  zephyr/CMakeFiles/offsets.dir/./arch/arm/core/offsets/offsets.c.obj  -fuse-ld=bfd  -T  zephyr/linker_zephyr_pre0.cmd  -Wl,-Map=…/EmbeddedSwift-nRF52-Examples/LED/build/zephyr/zephyr_pre0.map  -Wl,--whole-archive  app/libapp.a  zephyr/libzephyr.a  zephyr/arch/common/libarch__common.a  zephyr/arch/arch/arm/core/libarch__arm__core.a  zephyr/arch/arch/arm/core/cortex_m/libarch__arm__core__cortex_m.a  zephyr/arch/arch/arm/core/mpu/libarch__arm__core__mpu.a  zephyr/lib/libc/picolibc/liblib__libc__picolibc.a  zephyr/lib/libc/common/liblib__libc__common.a  zephyr/soc/soc/nrf52840/libsoc__nordic.a  zephyr/drivers/clock_control/libdrivers__clock_control.a  zephyr/drivers/console/libdrivers__console.a  zephyr/drivers/gpio/libdrivers__gpio.a  zephyr/drivers/pinctrl/libdrivers__pinctrl.a  zephyr/drivers/serial/libdrivers__serial.a  zephyr/drivers/timer/libdrivers__timer.a  modules/nrf/drivers/hw_cc3xx/lib..__nrf__drivers__hw_cc3xx.a  modules/hal_nordic/nrfx/libmodules__hal_nordic__nrfx.a  modules/segger/libmodules__segger.a  -Wl,--no-whole-archive  zephyr/kernel/libkernel.a  -L"/opt/nordic/ncs/toolchains/f8037e9b83/opt/zephyr-sdk/arm-zephyr-eabi/bin/../lib/gcc/arm-zephyr-eabi/12.2.0/thumb/v7e-m/nofp"  -L…/EmbeddedSwift-nRF52-Examples/LED/build/zephyr  -lgcc  zephyr/arch/common/libisr_tables.a  -mcpu=cortex-m4  -mthumb  -mabi=aapcs  -mfp16-format=ieee  -mtp=soft  -Wl,--gc-sections  -Wl,--build-id=none  -Wl,--sort-common=descending  -Wl,--sort-section=alignment  -Wl,-u,_OffsetAbsSyms  -Wl,-u,_ConfigAbsSyms  -nostdlib  -static  -Wl,-X  -Wl,-N  -Wl,--orphan-handling=warn  -Wl,-no-pie  -DPICOLIBC_LONG_LONG_PRINTF_SCANF  /opt/nordic/ncs/v2.7.0/nrfxlib/crypto/nrf_cc310_platform/lib/cortex-m4/soft-float/no-interrupts/libnrf_cc310_platform_0.9.19.a  --specs=picolibc.specs  -lc  -lgcc && cd …/EmbeddedSwift-nRF52-Examples/LED/build/zephyr && /opt/homebrew/Cellar/cmake/3.30.2/bin/cmake -E true
/opt/nordic/ncs/toolchains/f8037e9b83/opt/zephyr-sdk/arm-zephyr-eabi/bin/../lib/gcc/arm-zephyr-eabi/12.2.0/../../../../arm-zephyr-eabi/bin/ld.bfd: warning: orphan section `.swift_modhash' from `app/libapp.a(Main.swift.obj)' being placed in section `.swift_modhash'
collect2: error: ld returned 1 exit status
ninja: build stopped: subcommand failed.
FATAL ERROR: command exited with status 1: /opt/nordic/ncs/toolchains/f8037e9b83/bin/cmake --build …/EmbeddedSwift-nRF52-Examples/LED/build
This time however, the error is not coming from the Swift compiler but from a later phase in the process, and it’s the linker that’s complaining, with a very explicit “ld returned 1” error message.
At this point I was very puzzled and this got me into a rabbit hole of trying to understand more about the build system and how to get more verbose information; the different stages of the build process with compilers, linkers, linker scripts, sections… and many more low-level aspects.
I grew my general understanding but could not find the solution.
Then one day, I checked again the swift-embedded-examples repository from Apple and saw that Kuba Mracek, the engineer that presented the Embedded Swift session during WWDC 2024), had made a commit on the project.
I updated my project with his changes and it worked!
The bit of the commit that fixed the issue is
    # Disable PIC
    "$<$<COMPILE_LANGUAGE:Swift>:SHELL:-Xcc -fno-pic>"
pic stands for Position-Independent Code and although at a very high-level, after having read more on the topic, I think I understand why it might cause issues, I doubt I would have found the solution by myself (in a bounded amount of time); more on this in the conclusion.
Anyway, with that in place, we can put the finishing touches and handle all potential errors thrown by the C code. You’ll find that implementation in the example code on GitHub.
Conclusion
In this post, I have shown how, starting from Apple sample code, we can create a Swift struct that encapsulate an LED behaviour and make the code that uses it feel natural to Swift developers.
I’ve shown some of the challenges I faced during that implementation and how I overcame them. Sometimes it’s about learning more on topics that are less common to typical iOS or macOS development. Sometimes it took persistence and some fortunate timing to find the right solution; but don’t be too stubborn (like I sometime was) and reach out for help.
Embedded Swift is still in its infancy, I would encourage you to check the Embedded topics on the swift.org forums or the blogs and projects from the community.
Now that we’ve encapsulated an LED, the next step is adding some interactivity. In the next post of this series, we’ll explore how to make button code more Swift-friendly.
Our next challenge