Using SWD pins on Seeed Studio XIAO nRF52840
Introduction
When I discovered the Omi (previously Friend) project and wanted to build myself a device, I followed the instructions on their getting started page. For the firmware, this meant: open the project in VSCode, build, double-click reset on the nRF board, and drap-and-drop the zephyr.uf2 file into the flash drive that appeared on the computer.
As I wanted to make some changes to the firmware code, I wanted to improve on this process, most importantly, get feedback on what’s happening on the board, through console logs.
I thus started to look at how I could use the SWD pins present on the board.
TL;DR
It turns out you don’t need to do anything to get access to the console output. Simply plug your board into your computer and a new serial port should appear. Connecting to the port with a terminal application gives you access to the logs.
As to using those SWD pins, I did accomplish it using a nRF52840 DK, a Seeed Studio Expansion Board Base and the following cabling:
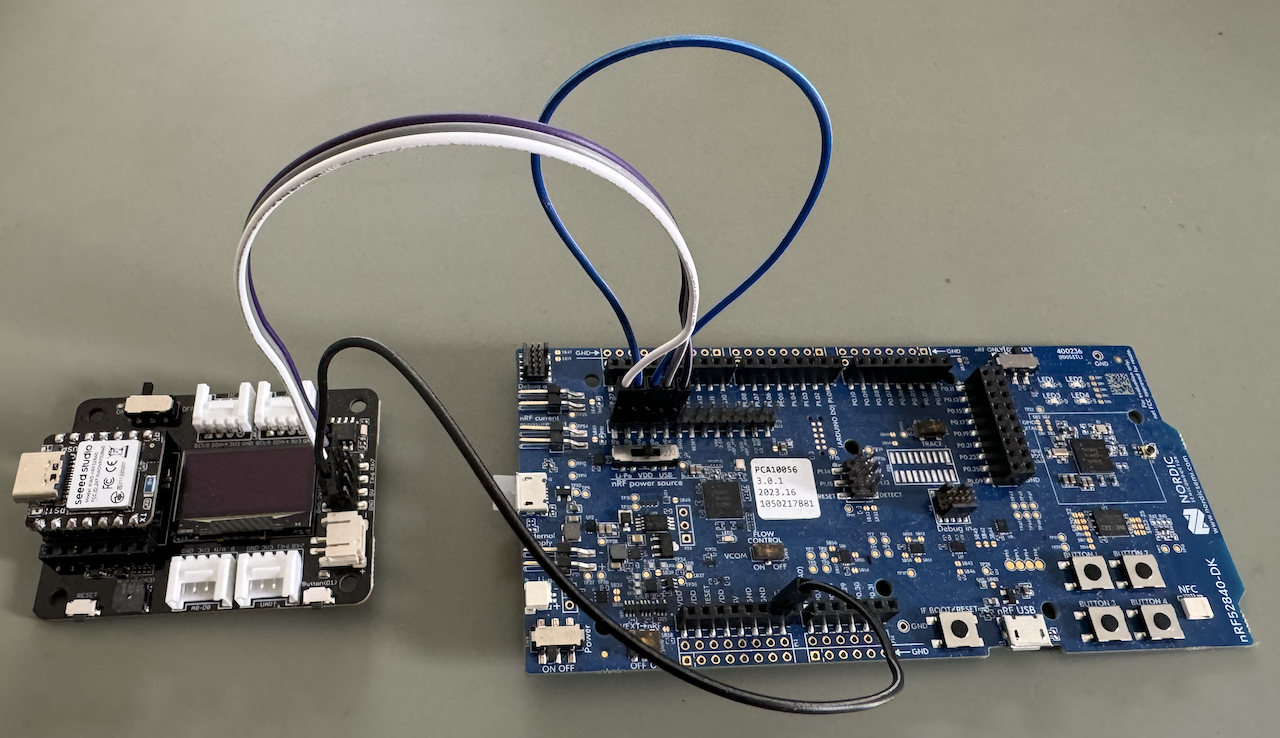
Final cabling connecting J-Link debugger to XIAO board
Warning
Do NOT connect the XIAO board via USB-C when using this configuration !
Where to connect those SWD pins ?
The Getting Started guide on the seeed studio wiki briefly mentions how to access the SWD Pins for Debugging and Reflashing Bootloader. But the information there is quite terse. And it points to using a J-Link device from Segger, the cheapest found on-line being around 400 €. That’s a bit too much for a hobby.
After some more research, I found using an nRF52840 DK was a possible alternative. Indeed its product page indicates
It comes with an on-board SEGGER J-Link debugger allowing programming and debugging both the on-board SoC and external targets through the debug out header.
That board can be found for less than 60 € from many on-line resellers and it’s also a great board to use standalone for experimentation (it has LEDs, buttons, is compatible with Arduino shields…). So I bought one.
But I still had no explanation of how to connect the SWD pins on the back of the XIAO board to the debug out header.
The answer in this post (VS Code nRF Connect extension “Connected Devices” not capturing my device. - Nordic Q&A - Nordic DevZone - Nordic DevZone) gave some pointers but mostly indicated that using a Seeed Studio Expansion Board Base for XIAO made things much easier, eliminating the need to solder directly the SWD pins on the nRF board. But still no clear connection diagram.
I did however order an expansion board, as well as header pins for the XIAO board.
And I continued doing more research (including in the Friend discord channel) and looked at the connectors on the board.
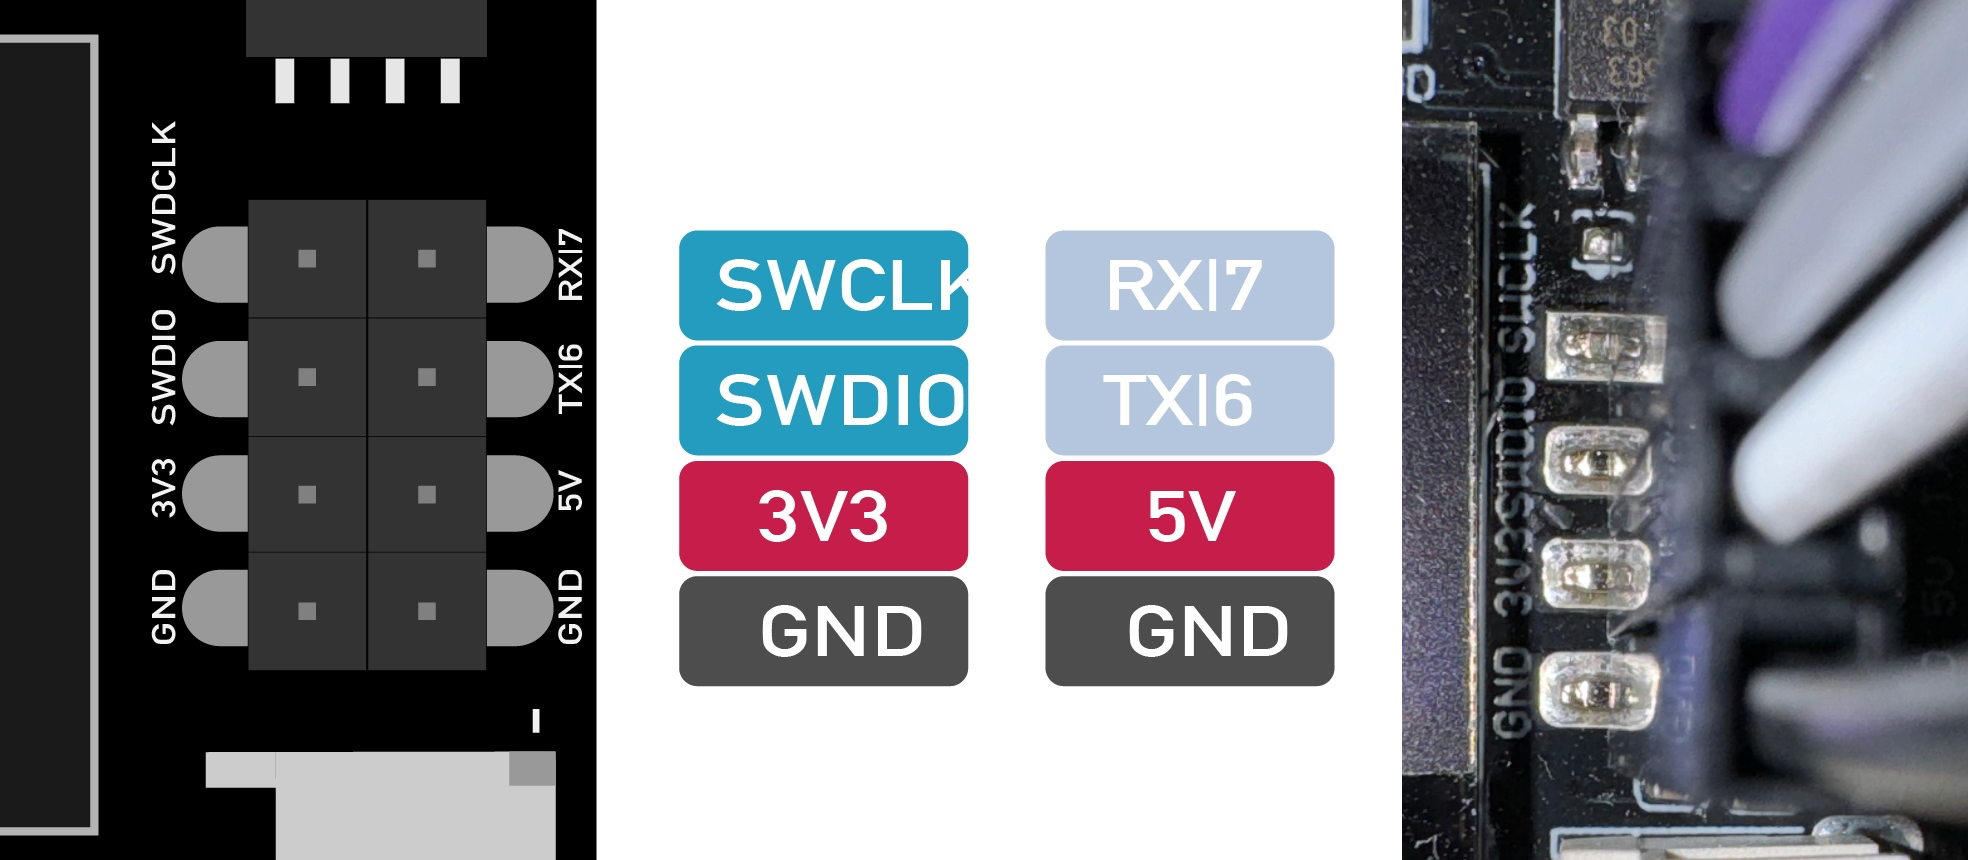
Expansion board SWD PINs, on the schema and on the board
Eventually, connecting this to the corresponding PINs on the nRF52840 DK, I ended-up with a cabling that looked like this
Initial cabling between nRF 52840 DK and expansion board
But when looking at the connected devices in the nRF Connect extension in VS Code, all I could see is the nRF52840 DK, not the XIAO board.
nRF52840 DK showing up instead of XIAO board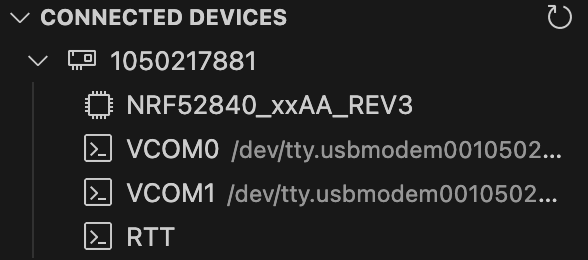
Finding the fix
I double-checked the cabling multiple times, re-read the articles I had found and searched for new ones. Eventually, I found this post, where in the first answer, somebody explains that, with the latest DK version (revision 3, which I have), you need to bridge the 2 pins between the existing cables. On my board, those are labeled VDD nRF and SWD SEL.
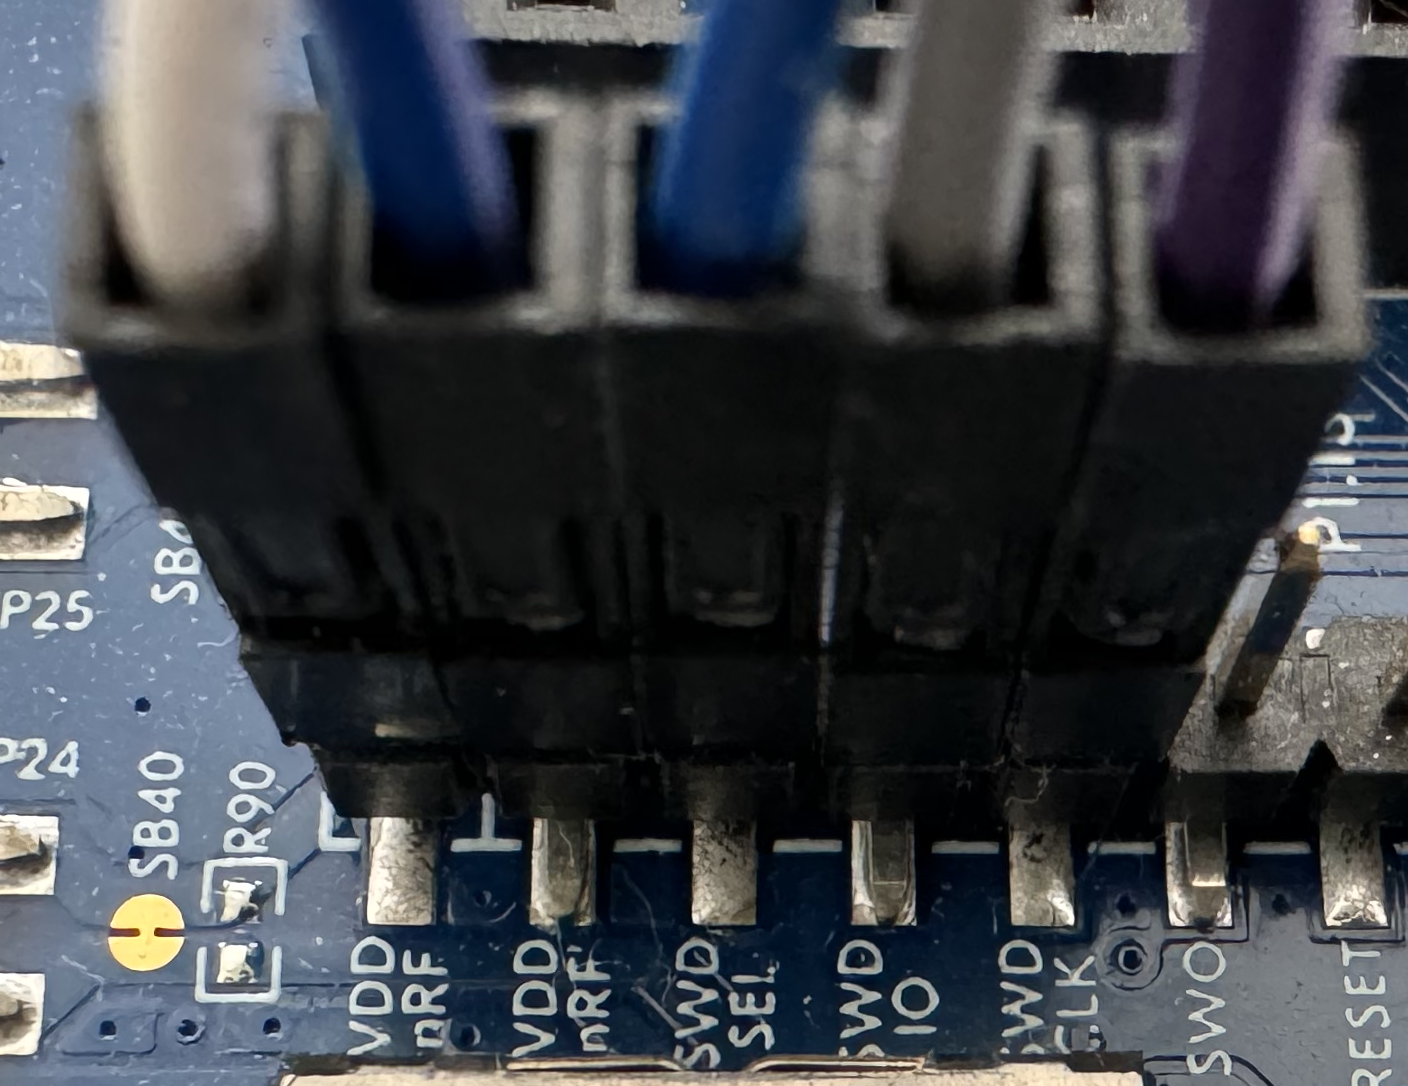
Bridging VDD nRF and SWD SEL pins
And with that in place, the XIAO board is now showing properly in VS Code.
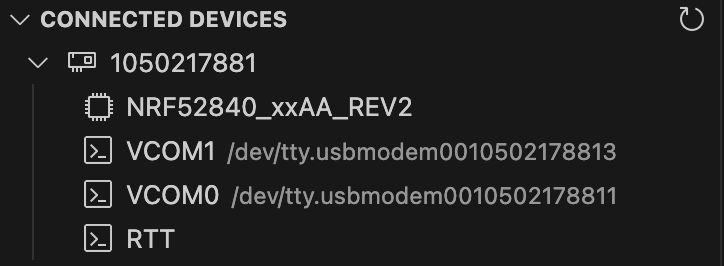
XIAO board showing up as expected in VS Code
What can I do with this ?
As expected, I can now use the Flash command from the nRF Connect extension in VS Code to directly flash the XIAO board, no more double-clicking that ridiculously small reset button and copying a file.
I should also be able to debug and step through the program running on the board, inspect processor registers, … but this is something I haven’t looked at in details yet.
But one thing I could not do, is see the console logs, the COM ports appearing under the connected device being the ones from the DK, not the XIAO.
Where are my logs ?
I found the answer by chance, while looking at an introduction video to the XIAO nRF52840 board, where the presenter mentions that a serial port is created when you plug-in the board.
Info
As an aside, check out the WSN & IoT YouTube channel, there are quite a few interesting videos there, covering different topics related to embedded systems.
So I started a serial terminal app (I’m using SerialTools on the Mac) and checked the existing serial ports.
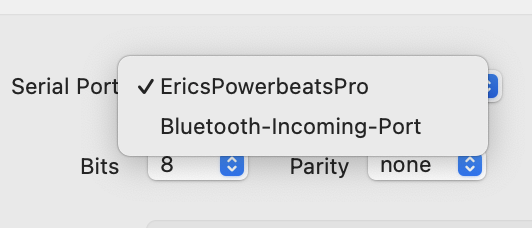
Serial ports on my Mac before connecting the XIAO board
I then plugged in the XIAO board and indeed a new port appeared. I could connect to it and there were my logs.
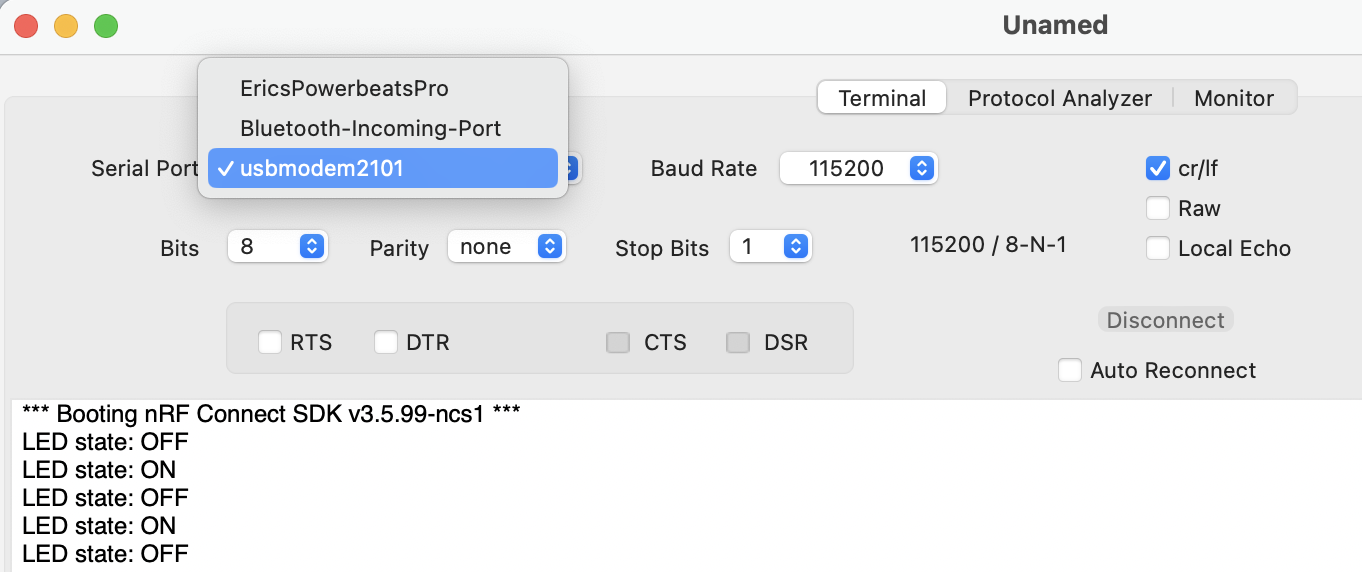
Connected to the XIAO board serial port and looking at the logs
Warning
In this post referenced earlier, it clearly mentioned to NOT plug in the target board (XIAO), that it should only be getting power from the programming board (DK).
However, this meant I could not get my logs anymore. So I tried not patching the 3V3 supply on the expansion board from the DK and plugging in the USB-C on the XIAO board.
It did not work reliably for me and led to all sorts of issues with the board. Just don’t do it.
Board issues
When trying the above configuration (connecting both the DK and the XIAO board), here is what I observed:
- Initially, I could connect to the serial port and see my logs and I also saw my board appear in VS Code.
- I flashed an application via VS Code and it indicated a successful operation, however my program was not executing on the board, I had to manually press reset on the XIAO to start it.
- The second time I flashed the application, the program did not start but a reset did not do anything.
- I removed the XIAO board from the DK and connected it directly via USB, nothing happened, no LED, no serial port appeared. Double-clicking the reset button did not make the board appear as a USB drive on my Mac.
At this point, I thought the board might be dead. But if I connected it via the DK (and only via the DK), I could still see it in VS Code.
After some research, I thought maybe the bootloader was gone/corrupted and I followed the procedure in Embeddronics-ltd/Flashing-Bootloader-Xiao-BlE: Installation of bootloader in xiao ble, using J-Flash to flash it back on the board.
That worked and I could then re-use the board as before. I tried a second time, not connecting the 3V3 and the ground cables but ended up with similar issues. So for now, I’ll just choose between seeing the logs or using the SWD flash/debug features.
Conclusion
Now with this setup, I’m better equipped to continue exploring the world of embedded dev, which is quite new for me.
As I progress through this journey, I’m putting together a list of interesting resources related to embedded systems, you can find it at Embedded development resources.
My end goal is to use (Embedded) Swift as the programming language for most of my embedded projects. I’ll be posting a lot about this in the coming months, so if you’re interested, come back often and follow me on the different social media.